It’s common to want to share files, photos, and other data between your devices—or with friends and family. When the desired person or device isn’t nearby, it’s easiest to use Messages or Mail. Say you want to move a file between two Macs, your iPhone, or to a friend who’s across the table? Apple provides AirDrop, a quick and easy way to move data between devices for transfers within immediate proximity.
Make Sure AirDrop Is Ready to Go
First off, AirDrop requires both Wi-Fi and Bluetooth, so make sure both are enabled. If you use wired Ethernet on your Mac, it allows Wi-Fi but put the Wi-Fi service beneath the Ethernet service in System Preferences > Network (click the down-pointing arrow under the list and choose Set Service Order).
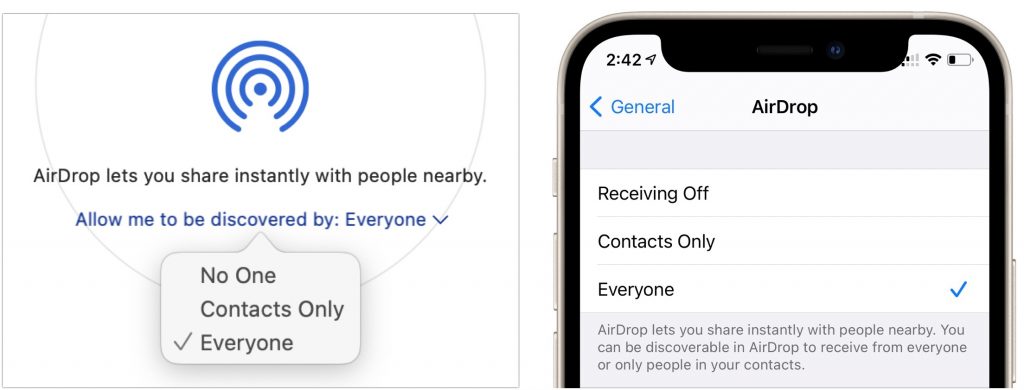
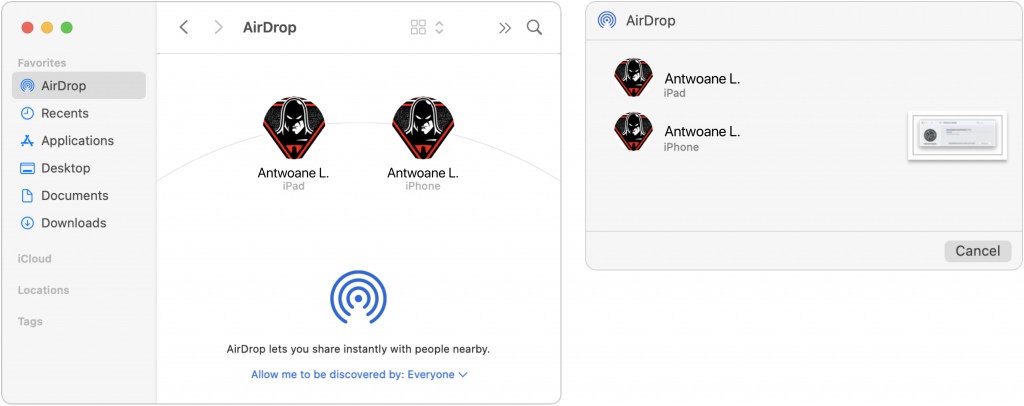
Next, make sure other devices can discover you. On the Mac, choose Go > AirDrop and, near the bottom of the Finder window that appears, select Everyone from the pop-up menu. (If you’re out in public and random people keep trying to send you files, which would be weird, choose Contacts Only instead.) On an iPhone or iPad, go to Settings > General > AirDrop and select Everyone.
Send a File or Photo via AirDrop
Apple has integrated AirDrop into the standard sharing mechanism in macOS, iOS, and iPadOS, so sharing via AirDrop works the same as sharing via most other apps.
The most straightforward approach in the Finder on the Mac is to select AirDrop in a Finder window’s sidebar and then drag files to the icon representing the destination device (below left). You can also choose one or more files and select File> Share > AirDrop or Control-click them and choose Share > AirDrop, both of which present a dialog from which you can choose the destination (below right). The right-hand dialogue is also what you’ll see if you use the Share option in Photos or any other app.
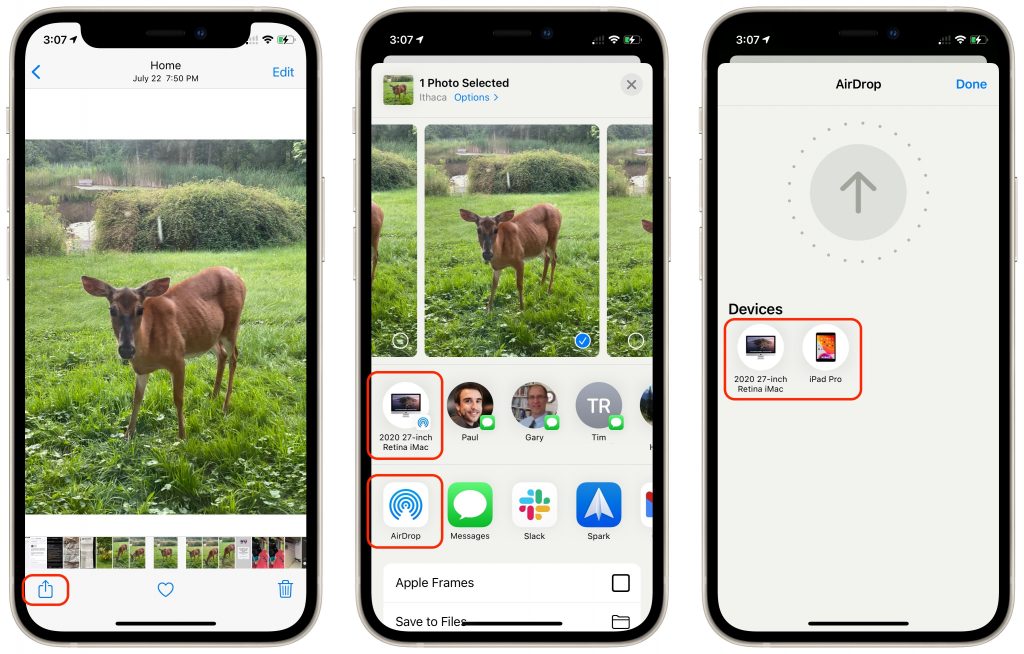
When you’re viewing the item you want to share on an iPhone or iPad, tap the Share button to bring up the Share sheet. You may be able to tap the AirDrop icon for the desired destination directly in the top row, but if it doesn’t show what you want, tap the available AirDrop icon in the second row to display the AirDrop screen with icons for all known destinations. Either way, tap the goal to send the File.
Receive Data via AirDrop
AirDrop is utterly simple on the receiving side, particularly when transferring files between your devices, though the experience varies slightly depending on the direction and file type.
- Receiving on a Mac: If you’re transferring between your own devices, you don’t need to do anything; the File will appear in the Downloads folder of the destination Mac. Files sent from other people will appear there too, but you’ll get a prompt asking you to accept or decline the File, and if you buy, an option to open it in the appropriate app.

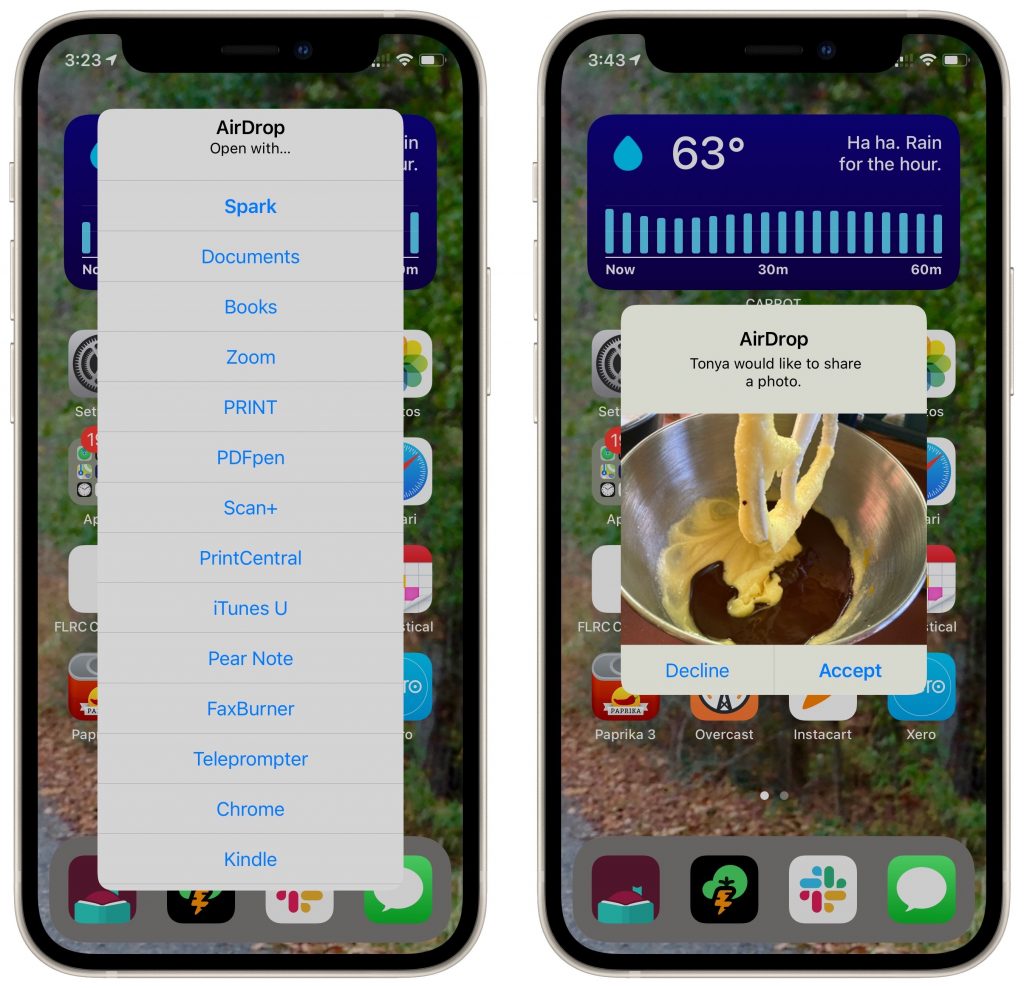
- Receiving on an iPhone/iPad: Receiving on an iPhone or iPad is similar, with one additional step. Unless iOS/iPadOS knows where the File should go (images always import into Photos automatically, for instance), it prompts you with a list of apps that can open the File. Files you transfer between your own devices are accepted automatically; you must tap the Accept button for files from other people.
Troubleshooting
AirDrop has been around since Mac OS X 10.7 Lion in 2011 and has seen significant updates since then. So if you had trouble getting AirDrop to work years ago, it’s worth revisiting the feature. That said, problems can still crop up:
- If a Mac doesn’t appear as an AirDrop destination, make sure it has Wi-Fi active. Ethernet is not sufficient. Also, if Mac’s firewall is active, check that it allows incoming connections. Open System Preferences > Security & Privacy > Firewall > Firewall Options and deselect “Block all incoming connections.”
- If an iPhone doesn’t appear as an AirDrop destination, make sure Personal Hotspot is turned off in Settings > Personal Hotspot.
- Because AirDrop relies on Bluetooth and Wi-Fi, interference with either, or a separation between devices of more than 30 feet (9 meters), can cause performance and reliability to suffer.
- For best results, make sure you’re using recent Apple hardware running the latest versions of macOS, iOS, and iPadOS. Apple has improved AirDrop over the years, and it works significantly better than it did years ago. Technically, AirDrop requires a Mac introduced in 2012 (excluding the 2012 Mac Pro) or later running OS X 10.10 Yosemite. On the mobile device side, the iPhone, iPad, or iPod touch must be running at least iOS 7.
- If you’re prompted to accept transfers between your own devices, that indicates that the devices aren’t logged in to the same iCloud account.
- Although AirDrop has no explicit size limit, huge files (over 500 MB) will take a long time to transfer and are more likely to fail due to network issues during the transfer.
- If you can’t find a transferred file in the destination Mac’s Downloads folder, remember that it retains its original creation and modification dates, so it might be sorted differently than you expect.
Next time you need to move data between nearby Apple devices, give AirDrop a try!
(Featured image by iStock.com/jroballo)